AI in Webex
Guide
Implement, register, configure, and verify a partner-hosted Media Forking gRPC endpoint that receives caller and agent audio from Webex Contact Center.
anchorBefore you begin
anchorThe customer organization must have the Media Forking offer (MFCS) on its Webex Contact Center subscription. The orderable SKUs are A-FLEX-MEDSTRM (Flex 3) and E3CE-MEDSTRM (Enterprise Agreement). For Flex 3 ordering details, see the ordering guide and data sheet.
Prepare a Webex Contact Center organization with a Full Admin who can authorize a Service App and an administrator who can edit, validate, and publish a flow. Implement a publicly reachable gRPC endpoint and secure it with TLS using a currently valid, publicly issued server certificate for the registered hostname. Optionally, add mutual TLS (mTLS) for transport-level client authentication. Require a client certificate and validate its issuer, validity window, and tenant-documented Webex CCAI identity. Do not use mTLS instead of runtime JSON Web Signature (JWS) validation.
Use the CiscoDevNet provider sample as a protocol reference, and adapt it to your processing and operational requirements. Its current Java validator retrieves keys before checking the issuer allowlist and tests every returned key; do not reuse that authentication path unchanged.
anchorTry the receiver sample
anchorThe WebexSamples Node.js receiver provides TLS and JWS validation, the media and health RPCs, bounded audio handling, and optional WAV recording. Start with its synthetic demo before connecting an organization.
Install Node.js 24, then run:
git clone https://github.com/WebexSamples/webex-contact-center-media-forking-sample.git
cd webex-contact-center-media-forking-sample
npm ci
npm run demo
Expect media_received logs for CALLER and AGENT, stream_completed, and Demo passed. The demo sends distinct one-second synthetic tones over loopback, verifies a final SUCCESS, and checks that an unauthenticated stream is rejected. It needs no Webex organization or credentials. Its temporary keys and plaintext loopback transport are confined to the demo; npm start requires TLS and Webex JWS validation.
For a real organization, follow the sample setup walkthrough and the registration and flow steps below. Copy .env.example to .env, set the registered data-source bindings and TLS certificate/key paths, and run npm start. The receiver requires TLS 1.3 and an HTTP/2-capable public network path. Keep credentials and tenant configuration out of source control.
Add your processing in lib/audio.mjs. The handler receives validated, normalized non-empty audio and an AbortSignal; honor cancellation and set downstream timeouts. The starter accepts one configured customer organization and data source per process. Its validation notes distinguish synthetic checks, live SDK calls, and remaining coverage; the sample is not certified for production capacity or reliability.
anchorImplement the gRPC endpoint
anchorWebex Contact Center acts as the gRPC client. Your partner-hosted service acts as the server and implements this bidirectional streaming RPC:
service ConversationAudio {
  rpc StreamConversationAudio(stream ConversationAudioForkingRequest)
      returns (stream ConversationAudioForkingResponse);
}
Handle opening metadata and audio packets separately:
- Validate the opening message's
conversation_id,customer_org_id,audio.role, andaudio.role_id, and retain the declared encoding and sample rate for that leg. Webex can send this metadata before any audio bytes arrive. - Process non-empty
audio.audio_dataas raw audio. Later packets can omitcustomer_org_id, encoding, and sample rate; use only the previously validated metadata for the same conversation and leg. Reject explicit identity mismatches. Preserveaudio.audio_timestampwhen present; do not invent a capture timestamp when it is omitted. - Read
audio.roleandaudio.role_idto identify the media leg. - Use
(customer_org_id, conversation_id, role, role_id)as the processing key so that individual media legs remain separate. - Treat re-established streams as separate RPCs. Design downstream idempotency for your consumer; conversation and leg identifiers group media but are not unique packet identifiers. Capture timestamps are not a documented packet sequence.
- Use
ConversationAudioForkingResponse.status_messageanderror_codefor application status and processing errors. Terminate the RPC with an appropriate gRPC status for authentication, transport, or unrecoverable stream failures. - Complete the response stream after Webex completes its request stream and your endpoint finishes processing.
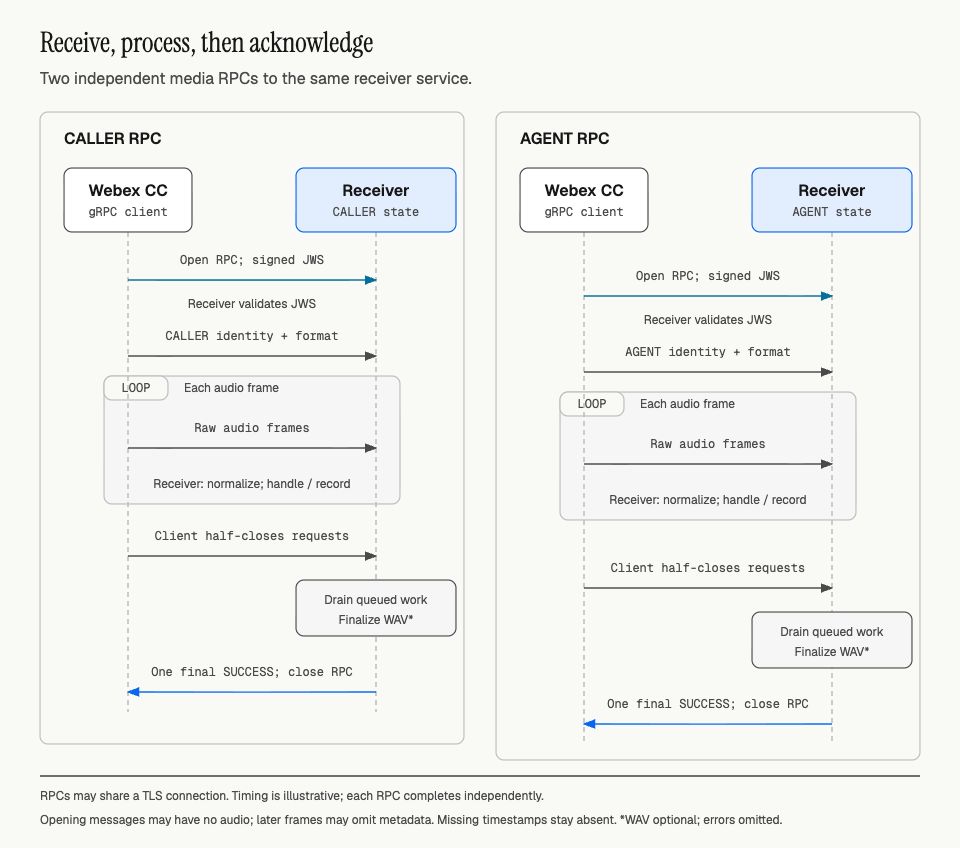
Example caller and agent RPCs to the same receiver. Timing is illustrative; each RPC completes independently and can share a TLS connection.
Caller and agent media can arrive on separate RPCs. Media Forking sends variable-sized raw mono audio frames, not a WAV container, at 8 kHz or 16 kHz. The protobuf defines LINEAR16, MULAW, and ALAW. The canonical Java sample logs the encoding and can append raw audio bytes to files; it does not decode or transcode them. Decode or transcode the audio as required by your downstream processor. The samples send one final SUCCESS acknowledgment per RPC after Webex completes its request stream, so do not expect a response for every audio frame.
Implement Check on the separate com.cisco.wcc.ccai.v1.Health service defined in the sample's health contract. Call the gRPC Check method on the service endpoint. This contract does not define an HTTP GET health page at /v1/ping. Return SERVING while the media service is ready to receive streams and NOT_SERVING when it is not ready.
Important: The customer is responsible for keeping the receiving service healthy and able to receive and process streamed data. Webex Contact Center does not maintain back pressure. Keep the gRPC receive callback non-blocking; buffer briefly within fixed bounds or shed load explicitly. If the receiver cannot receive or process the stream, any resulting data loss is permanent and cannot be recovered.
anchorCreate and authorize a Service App
anchorCreate a Service App in Webex for Developers.
Request the
spark-admin:datasource_readandspark-admin:datasource_writescopes to show the data-source settings.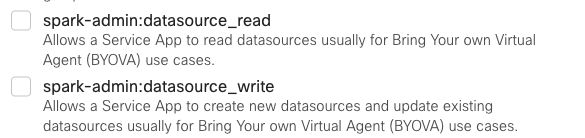
Data-source scope choices before selection in the new Service App form.
Enter a data exchange domain owned by the Service App owner that contains the gRPC endpoint. Do not include a port.
Select the Media Forking schema shown when you set up the Service App.

Example:
audio_forking_schemaselected in a new Service App form.Make the Service App visible to the target organization. Request admin authorization for the developer's own organization; for a non-affiliated customer organization, submit the app to Webex App Hub for review.
Ask a Full Admin of the customer organization to review and authorize the Service App in Control Hub.
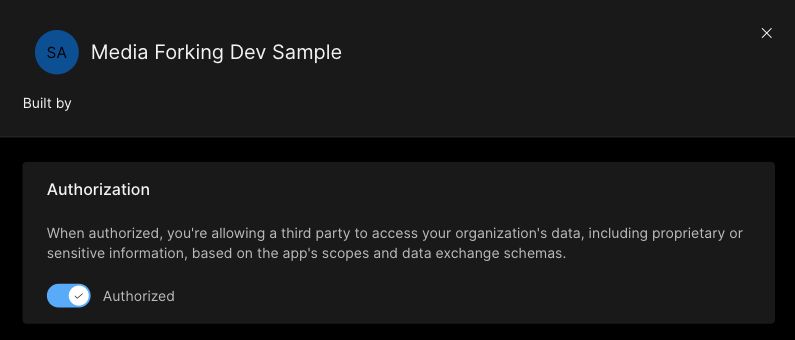
Example of a Service App already authorized in Control Hub.
Obtain the organization-specific Service App access and refresh tokens.
Store the app credentials and tokens securely.
Do not use a schema identifier copied from another integration. Use the Media Forking schema selected when you set up this integration.
anchorRegister the data source
anchorUse the Data Sources API with the organization-specific Service App access token.
- Register the endpoint for the customer organization.
- Follow the current API request schema. In
schemaId, supply the Media Forking schema selected for the Service App; also supply the endpoint URL, audience, subject, nonce, and a supported token lifetime. - Confirm that the endpoint URL satisfies the Service App's data exchange domain rule.
- Record the returned data source identifier.
- Before the current JWS token expires, update the registered data source with the complete required payload, including its current
statusand a newnonce. The configured token lifetime can be at most 1440 minutes (24 hours). Renew with a safety margin before the signed JWTexp; do not wait until the last second shown by a REST expiry display. OAuth access-token renewal and data-source JWS renewal are separate operations; the sample does not automate them.
Use OAuth tokens only to manage the data source through the API. For each media RPC, extract the JWS from the gRPC authorization metadata and validate all of the following:
- The issuer against an allowlist of Webex issuers before retrieving verification keys.
- The
RS256algorithm and RSA signature, using the Cisco public key identified by the JWS header'skidfrom${iss}/oauth2/v2/keys/verificationjwk/. - The expiration time.
- The audience and subject claims against the values registered for the data source, and the presence of the JWT ID.
- The
com.cisco.datasource.urlclaim against the registered endpoint URL. - The
com.cisco.datasource.schema.uuidclaim against the selected Media Forking schema. - The signed
com.cisco.org.uuidclaim against the opening metadata'scustomer_org_id. Keep that binding for later packets that omit the field, and reject an explicit mismatch.
Reject a missing or invalid JWS with UNAUTHENTICATED. Keep JWS validation enabled even when you use mTLS.
anchorSelect the Service App
anchorSelect the authorized Service App directly in the Start Media Stream activity. Media Forking does not require a separate configuration under Contact Center > Integrations > Features.
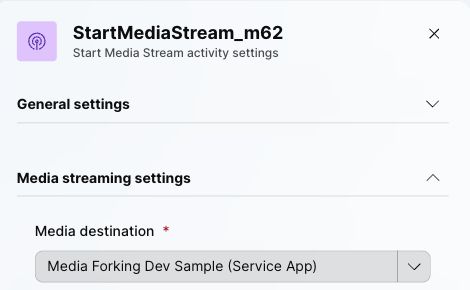
Example media destination; select the Service App authorized for your organization.
anchorConfigure the flow
anchorEnable the test agent for Contact Center, assign its site, team, and desktop profile, and ensure the queue distributes calls to that team.
Open the target inbound flow in Flow Designer. Route the main flow through Queue Contact to the intended queue.
In Event Flows, connect AgentAccepted (called AgentAnswered in older flows) to Start Media Stream.
Under Media streaming settings > Media destination, select the authorized Service App directly.
Connect the activity's success and failure exits to End Flow so the event handler finishes.
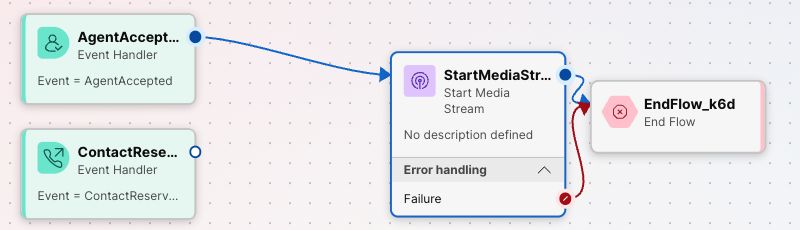
Example from a saved flow version. Generated activity labels can differ in your flow.
Validate the flow, resolve validation errors, and publish it.
Map the test entry point to that flow and its published version label.
The activity needs an answered caller-agent conversation. A normal main path usually runs before the agent connects and can fail with callNotAnswered; use the agent-answer event handler for the inbound path above.
For queue-specific conditional logic in Flow Designer, see Enabling media streaming for specific queues in the Webex Help Center.
anchorVerify the integration
anchor- Confirm that the health
CheckRPC reportsSERVINGwhen the receiver is ready andNOT_SERVINGwhen it is not ready. - Confirm that the endpoint rejects an audio RPC that does not contain a valid JWS.
- Place a test call through the configured flow.
- Have an agent answer the call.
- Confirm that the Start Media Stream activity opens a stream to the registered endpoint.
- Confirm receipt of non-empty audio for both
CALLERandAGENTroles, including when they use separate RPCs. - Verify that the endpoint preserves conversation and role identifiers.
- Verify that the endpoint handles opening metadata, sparse audio packets, and the declared encoding and sample rate. Record whether capture timestamps are supplied.
- End the call and confirm that both sides close the stream cleanly.
- Check server logs for expired tokens, URL or schema claim mismatches, stream failures, and successful completion.
anchorRecord WAV audio with the sample
anchorMedia Forking supplies raw audio; the Node.js sample can wrap received bytes in a WAV container without transcoding. Recording is disabled by default. To try it with synthetic caller and agent tones:
RECORDING_DIR=./recordings npm run demo
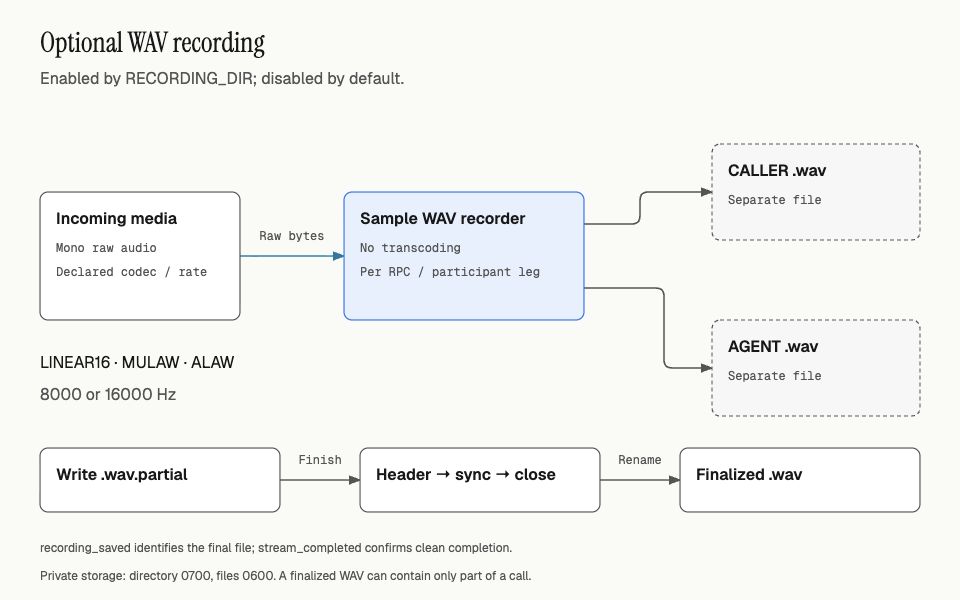
Caller and agent labels illustrate separate outputs. Actual filenames include generated stream, leg, and segment identifiers.
To record real incoming streams, set RECORDING_DIR=./recordings in .env and run npm start. Each RPC/participant leg gets a separate mono WAV file using its declared LINEAR16, MULAW, or ALAW encoding at 8000 or 16000 Hz. Use a player that supports the codec. Reconnects create new files; format changes start new segments. Files retain arrival order without mixing participants, filling gaps, or aligning timestamps.
Look for recording_saved followed by stream_completed. The writer finalizes the header, syncs and closes the file, then renames .wav.partial to .wav before acknowledging success. Cancellation can still produce a valid WAV covering only part of a call; check stream_failed as well. A crash or disk error can leave .partial files, which the sample does not recover automatically.
The sample requires a private, writable recording directory (0700) and creates files with mode 0600. Keep recordings outside web-served paths, use encrypted storage, monitor available space, and define a retention/cleanup policy. Disk exhaustion fails the stream. See recording behavior and limits before enabling capture.
anchorTroubleshoot the connection
anchor| Symptom | Check |
|---|---|
| Service App is unavailable or cannot be authorized | Confirm the Media Forking subscription, selected schema, app visibility, and customer admin authorization. A data-source registration alone does not establish entitlement. |
| No configuration appears under Integrations > Features | Select the Service App directly in Start Media Stream; the flow does not need a separate Features configuration. |
callNotAnswered | Start streaming after the agent answers, using the agent-answer event handler described above. |
| No connection or unhealthy receiver | Check the registered hostname and URL, publicly trusted TLS certificate, HTTP/2 routing, and Cisco gRPC health Check. An HTTP health page does not implement that contract. |
UNAUTHENTICATED | Check signed expiry and the registered issuer, audience, subject, URL, schema, and organization bindings. Renew an expired data-source JWS with a fresh nonce and the complete update payload. Keep token values out of logs. |
| Audio arrives without metadata fields or timestamps | Retain validated opening metadata for that leg and preserve missing timestamps as absent. Do not reject a packet only because inherited fields are omitted. |
Recording fails or only a .partial file exists | Check directory permissions, write/search access, disk space, and stream failure logs. A finalized WAV can still contain only part of a call. |