Webex Detailed Call History API
January 23, 2023

Webex Calling customers have long been able to download their historical call detail records from the Control Hub. They have also been able to create and download these reports using the API. What some customers have been waiting for is a quicker way to get the call details in a programmatic way. In December 2022, Cisco release a new API just for this use case. This API provides access to calls that have completed between 48 hours ago to 5 minutes ago.
Understanding the Detailed Call History API
Users do have some up font work to access this API. First, you’ll notice that this has a different API endpoint, other Webex APIs go to https://webexapis.com/v1. To use this new API, you’ll need to point your code to https://analytics.webexapis.com/v1. This does not change how you will authenticate to Webex to get your Access Token and Refresh Token, that still stays the same. Follow this guide for any questions on how to setup your authentication. For my demo code, I have the Redirect URL going to https://localhost:8080/webex-teams-auth.html.

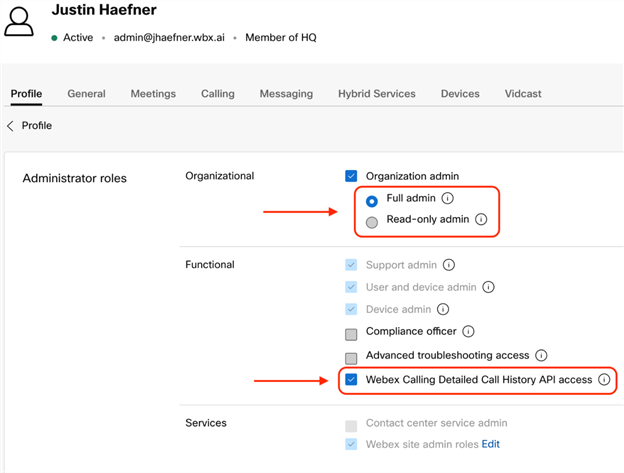
Next, adding a specific scope (spark-admin:calling_cdr_read and spark-admin:locations_read) in your code as well as your integration isn’t anything new for Webex APIs but what is new is making sure that your user who creates the integration has a specific role set in Control Hub allowing access to this API.
Once you have your scopes, Control Hub rights and new API endpoint you’re good to start querying this API. I’ve created some example code that we can step through to help understand the basics of this API. Hopefully after this article you’ll be able to take these basic concepts and create some business value for your organization.
Code Overview
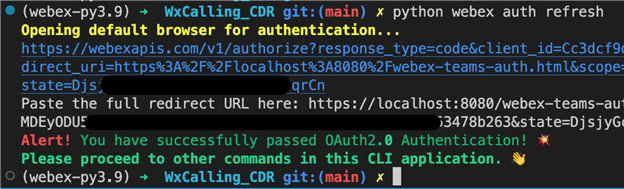
For this demonstration, I decided to create a Command Line Interface application. IT administrators have used CLI applications for a variety of different use cases. For this demo, we have 3 things we need to solve in the CLI: Authentication, Locations and Analytics. The authentication is the OAuth2.0 flow that we’ve come to understand. Once the user has setup the Integration and copied the Client ID and Secret ID into the .env file, the CLI application is ready to be used. Kicking off the python webex auth refresh will start the OAuth2.0 process, the user will need to authenticate to Webex and agree to the scopes being requested by the integration. This CLI application will then save the Access Token and Refresh Token into the same .env file to be used by the other aspects of this CLI application.
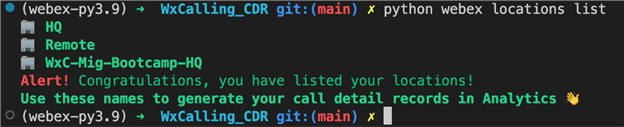
Once we’re authenticated and we have our Access and Refresh Tokens in our .env file, we can move on to doing some API calls. In this demo application we’re going to request only the call detail history for a specific site, so first we need to list out our location names. Note that the Detailed Call History doesn’t require a site be listed for the API query but for my demo I’m using it to show how it can be leveraged to reduce the data returned by the API. By typing python webex location list we will get a list of names of all our locations. The user will then use this list later to specify which location they want the call records for.
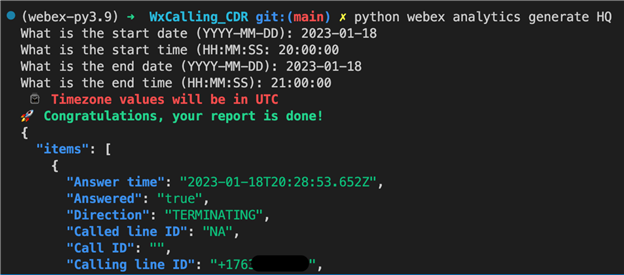
Now we’re ready to query the new API for the call history for a location. By typing python webex analytics generate (site name) we’ll be greeted with a series of questions asking to specify the date and time of our query. We need to enter in our start and end times, remembering that we cannot request records older then 48 hours and younger then 5 minutes for the time of query. Also please be advised that all times are in UTC.
def create_report(self, start: str, end: str, site: str):
 payload = {
   'startTime': start,
    'endTime': end,
    'locations': site,
   # 'max':
  }
  # this is finally where we make our API call for Analytics
  response = self.session.get(url=self.base_url, params=payload)
  return response.text
Finally, we’ll get back the results of our query in JSON format. Organizations could modify the code at this point to save off the data to another system for a deeper investigation.
Conclusion
The code that was used is all publicly available here but most of the code is to just make the CLI application user friendly. Making the API requests can be accomplished many ways, this demo just shows one way of doing it.